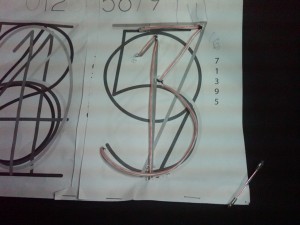
Speed Vest digits lighting up
An important part of the Speed Vest project is shaping the electroluminescent wire into digits. The original creators provide a layout template, which has odd digits only on the right, and 0 through 6 on the left. I wanted to do all possible digits on the right, leaving me with only 1 and 2 on the left (I wouldn’t be going over 29 mph unless I was on a steep downhill in any case). With some careful xeroxing, I was able to overlay multiple copies of the template on the right side so that all digits except the number 8 were represented. I wanted to sew on their original odd numbers first, in case the authors were correct in saying that too many layers of EL wire cause problems. This meant 3 layers of paper on the right, which was a little tough to work with, but not impossible.
In the original article, the authors were very enthusiastic about the Buttoneer. It sounds like a wonderful tool: simply load and press, and dual plungers attach a button (or wire) into fabric using a u-shaped fastener. It was available at the same store as the EL wire, so I bought it, along with a refill pack, even though the supplier mentioned that it was only good for thinner wire than what I was using. I thought this would make attaching the wire very fast.
Unfortunately, the Buttoneer is a completely waste of time. I could not even attach the sample buttons after dozens of tries. I finally went to Amazon to see what other people were saying. It turns out the Buttoneer used to be a great tool. Then it was sold to another company, the design was changed, and it is no longer any good. It is possible to get the older version on eBay, but since refills for it are no longer made, it isn’t very useful. This was a big disappointment.
Doing some research, I found that the standard way of attaching EL wire to clothing is to sew it on with monofilament thread. I already had some of this thread, thanks to a glow-in-the-dark solar system kit I had hung on Laurel’s ceiling. It was a bit difficult pushing my smallish sewing needle through the denim cloth, and my first stitches were not very good. Fortunately most digits only required a few stitches, as the cloth tended to hold the wire in place at each end.
After all the digits were put on, the underlying paper template was torn away. On the right side, this was difficult due to the thickness of the paper and the density of overlapping wires. A few stitches were lost due to the strain. Needle nose pliers were helpful in removing the last of the paper.
The end result was very satisfying: all the digits worked and lit up properly. Here is a video. Note that the digits flash in random order; I have not edited the software to put them in order yet.
