FireCheetah navigates on his own
With less than a week to go before the robot competition, I have been working very hard. Most of the previous week was spent on navigation. With this particular maze design, there is a section where the robot is forced to move and do some turns without having a wall to guide it. I wanted to master this, knowing that it would be the hardest part. After a great deal of work (and stress) I figured out how to get the robot to go through reliably. Here is a video of the robot in action:
Along the way, I ran into two problems that nearly drove me crazy and cost a week of time:
- The robot would drive straight at times, but other times not. And when it wasn’t going mostly straight, navigation failed.
- Even when the robot went straight, it overshot the target distance. Now after some experimentation, I was able to compensate for this with various fudge factors in the software. However, these factors change on different surfaces and the Abington maze has a variety of them.
The first problem was by far the worst, as it was very frustrating to see a well-behaved machine suddenly turn into something that could not move an inch without listing severely to one side. Not always the same side! One step I took to help was to add more sensors, the two side sonar on the left. These helped with initial wall alignment and reduced the element of chance. Still, when the robot was in bad shape, nothing could help.
Eventually I figured out that the robot generally started its day working well, then degraded at a certain point. The first thing I looked at was the battery. But that wasn’t it. I found that leaving the robot alone for a few hours would allow it to recover, even without charging the battery. (The LiPo battery I’m using is a champion, and well worth the money. It never seems to hiccup or run out of juice. A world of difference from standard alkaline.)
Then I thought about what could be stressing the robot. It is well known that when the motors stall — under power but unable to move, probably because your robot hit a wall — the current surges. In theory, my motor controller was rated for a much higher current than the stall current for my motors. But these events can generate a lot of power = a lot of heat = potential thermal shutdown by the L298 chip on the motor controller board. So I took the robot when it was fresh and running straight, then deliberately stalled the motors. Sure enough, that killed any straight motion for several hours.
I added checks in the software to detect a stall and to cut power to the motors if one is detected. It’s probably a good idea to have the robot back off and/or reposition itself too. Simply protecting the motors gave a big improvement. I’ve also concluded that there is no need for me to run the bot at 12V. I have far more torque than I need and have only been doing 70% of top speed. If I lower the voltage to 9V, the power drain caused by a stall is only 60% of what it is at 12V. I will have to experiment and see if lowering the voltage causes any problems. Finally, I’ve ordered a heatsink to prevent the chip from overheating. Many experienced roboticists recommend using one, if nothing else it extends the life of your chip. It was a bit of a challenge to find a heat sink for a surface mount component.
Next, the travel overshoot. On my hardwood floor I could predict it fairly well, but that wasn’t good enough for general use. It finally occurred to me, there should be a way to actively brake the motors. Up to this point I was simply applying voltage to the motors, and at a higher duty cycle they moved faster. To stop, I sent no voltage. But the shaft could continue to spin for a while. After doing some research, I discovered that the L298 has a built-in brake that activates by setting both direction pins HIGH.
Wonderful news, but my lousy motor controller did not allow direct access to those pins. I had already noted that it also grounded the current sense pins which are an easy way to detect a stall. I had purchased it for its economical use of Arduino pins…bad idea. Time to replace it with the Arduino Motor Shield, conveniently available at local Radio Shacks (for once I did not have to pay exorbitant shipping to get a needed part quickly). The Arduino Motor Shields gives both current sensing and dynamic braking! And if you don’t need them, you can easily cut the jumpers and free up the pins. $10 more than the SparkFun product but a better design. It also uses the L298P, a more advanced version of the L298 chip that has better thermal resistance.
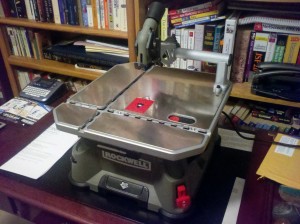
Navigation has consumed more time than I would have liked, but I have done some work on the fire detection as well. Most of that will be covered in another post. I did want to show off the new toy I bought to cut a hole for the detection servo:
This saw can be used for straight and mitre cuts, and as a scroll saw. I purchased the attachment to cut circles as well. I’ve been wanting a saw for a very long time, but was intimidated at the thought of buying one. The ones I used in the woodworking club seemed far too big for a home. The Amazon reviews were very helpful; and sure enough, this one proved to be extremely easy to use. It opens up many possibilities for new projects.
