Posts by Erica:
Playing with the Dremel
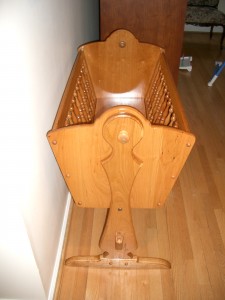
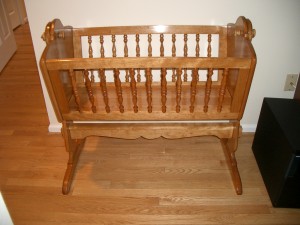
I used my Dremel 4000 for the first time to do a simple project, attaching a brass nameplate to the cherry wood cradle I made back in 2003. I spent many months building the cradle and got it done just in time for Laurel’s birth — we picked it up from the workshop on the way home from the hospital!
 |
 |
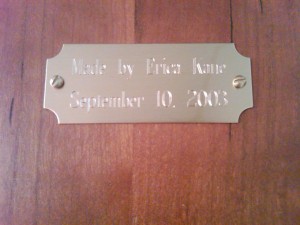
I considered doing the engraving myself, but I was able to get an engraved plate from Woodcraft for only $4.99 including shipping. Silly to do it on my own in that case. All that was needed here was to drill some small holes for the screws. I didn’t want the nameplate to be too visible, this is too nice a piece of furniture for that. I decided to put it on the bottom. When my grandchildren inherit it, they will know who made it.
I thought this would be a good opportunity to use the workstation / drill press stand I bought along with the Dremel. After trying it out, however, I have decided to return it. (Fortunately Amazon makes this easy, although I will have to pay the shipping.) The main problem is that it doesn’t fit my model (the numbers are confusing) but it also seems flimsy, no clamps, and hard to put together. I’d rather pay a bit more for a real drill press.
In the end I simply laid the panel on a special mat of rubber balls that I use for woodworking. There was no need for a vise because the piece is very large, and the holes to be drilled very small. I simply held the Dremel in a vertical position. I could have done the job with my DeWalt instead, but the Dremel did have a slightly nicer feel. No use of specialized accessories for this project. The final result:
Speed Vest digits lighting up
An important part of the Speed Vest project is shaping the electroluminescent wire into digits. The original creators provide a layout template, which has odd digits only on the right, and 0 through 6 on the left. I wanted to do all possible digits on the right, leaving me with only 1 and 2 on […]
Saving the TiVo
A couple of weeks ago, I started hearing some funny noises from our Series3 HD TiVo. Sort of like an engine periodically revving up then stopping. I said to my husband, “The cooling fan is going bad.” But we ignored it and eventually the noise went away. Until, a few days ago, the TiVo got stuck at […]
Replacing an ethernet cable jack
A week ago my 4 year-old daughter bounced on the bed and knocked off my laptop. The laptop was fine, but the ethernet cable had some minor damage. The plastic tab on the RJ-45 plug, which holds it in the computer socket, snapped off. At first, this didn’t seem like a big deal. The cable still worked well. […]
New toys for the workshop
I have some new toys to play with: The main item is the Dremel 4000. It can drill, sand, plane, shape, rout, basically do everything except bake bread. Initially I’ll be using it to make holes in the enclosure box for the Speed Vest. I do have another small project in mind. Years ago I […]
WordPress e-mail password recovery
I had quite a scare this morning. I went to add a new blog post, and discovered that I had forgotten my password. GoDaddy insists on stronger password protection than I normally use for sites like this, so I couldn’t remember it. No big deal, there is a nice “Lost password?” link on the page. […]
Lighting up the Speed Vest
With the circuit board wired up, the ribbon cable in place, and the electroluminescent wire connected, the Speed Vest was ready for its first end to end test. I used the sample code supplied to have the Arduino run through each of the output pins, lighting up each strand of wire to make sure everything […]
Learning to use heat-shrink wrap
With the ProtoShield wired up and the ribbon cable prepared, the next step for the Speed Vest was attaching the electroluminescent wires to individual strands of the cable. This was rather fun as it was my first chance to try something I’d been interested in for a while, heat-shrink wrapping. I paid my Coolight, my […]
How to make a ribbon cable
If you’ve ever worked around computers, you have seen IDC ribbon cables before. They are extremely common. So when I saw that the SpeedVest required a 14-wire ribbon cable with a 2×7 female header, I figured that I could simply get one at RadioShack or order it online. Turns out, it is not so simple […]
Constructing the Speed Vest circuit board
The electronic circuitry for the Speed Vest is fairly simple. A high-voltage, low ampere power supply lights up strands of electroluminescent (EL) wire. Each wire corresponds to a digit on either the left or right side of the vest. We use a microcontroller, the Arduino Duemilanove, to read input from the wired wheel sensor, calculate […]
